Finally… an Air Conditioner!

The heat, and to a lesser extent, the cold… it can be a problem in South West Idaho, which skirts the high desert area of Idaho. Situated about 30 minutes east of the Oregon border along the 84 FWY, some 60 to 80 miles north of the border with Nevada, the Treasure Valley, as the group of cities in the valley is collectively known as can be both hot in the summer, with the average temperature during July and August in the upper ninety’s to lower hundreds… and cold in the winter (I’ve seen the thermometer drop as low as -18 degrees). The cold is kept at bay pretty easily with a couple of electric oil heaters… and the games themselves when we’re out there playing… but the heat is another matter. Even with a couple of crappy roll-around air conditioners the heat simply was too much to have fun out in the garage during much of July and August… with the temperature with the games OFF in the lower eighties. All it took was a few games on along with a few bodies for the garagecade rise to the upper eighties… even lower nineties.
Something had to be done… and for the last 12 YEARS I’ve wanted to do something… and that something has finally been done! I have finally installed a decent air conditioner in the garagecade!! No more will I suffer through stifling hot arcade parties. No more will I languish in the July afternoon heat trying to recap that monitor with nothing but a half-assed Chinese branded “portable” AC half way across the room struggling to blow even luke-warm air in my direction… NO MORE! MY GRAIL HATH ARRIVED!
After some consideration, I chose to go with a thru-wall unit. I really wanted a multi-head mini-split system, but the costs were too great… so I ‘settled’ for a thru-wall. But I wanted it installed RIGHT… and after having couple of craigslist tweakers drop by to give me a bid, I decided to handle things myself. If you want it done right… (you know the saying).
The first order of business was to determine where I wanted the unit. I chose what I thought was the best location where the unit would blow out the door from one side of the garagecade to the other (the garagecade is a 3-car garage with a wall/door between the 2-car and 1-car sides). Unfortunately, after a quick check and verifying the location by cutting in to the drywall, I determined that my natural gas line ran down the wall right where I wanted to place the unit. Wouldn’t you know it? Anyway, I changed plans slightly and moved the unit over to the other side of the stud… and still partly in front of the door.
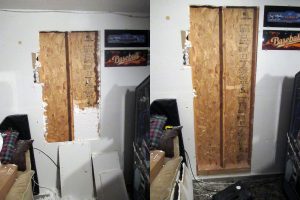
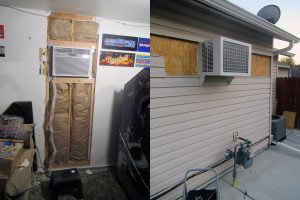
The next step was to cut out the drywall from ceiling to floor from one stud 32 inches over… skipping a stud, then down the next stud. I bagged up the insulation as I figured I’d throw it up in the attic… trying to use the cotton-fill insulation would be a pain in the ass so I bought a roll of fiberglass insulation to stick in the walls instead when the time comes. Next I measured 12 inches down from my header and cut. I needed 18″ + 3.5″ x 2 to account for the 4×4 header/footer I was putting in… so I then cut 25″ down from the first cut and knocked out the stud. I measured out a couple of 2×4’s to the same height as the cut center stud and then installed a couple of jack studs to the left and right studs. I installed the footer using angle brackets… checked the location of the header with the sleeve in place and then installed the header with the same angle brackets. I then finished out the “box” where the sleeve goes with a couple more 2x4s.
Next I installed the sleeve making sure that the sleeve was slightly angled downward at the back so that water would run off the back… it ended up being approximately 1 inch lower at back versus the front when all was said and done.
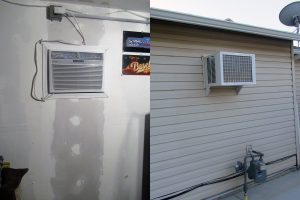
After my neighbor Rob helped me heave the unit up and into the sleeve, I installed the cover, filter and filter cover. Next I needed to run 220v power over to the unit. I chose to install a socket versus hard wiring as it makes replacement very simple. I also chose to run the line via conduit versus running it up in the attic as the header where my breaker box is located is about maxed out with holes and wires filling those holes. Because this is located in the “garagecade” and the fact that I have standard 110v lines run the same way as well… the conduit is perfectly acceptable. Maybe I’ll paint it Mario Bros pipe green or something.
After the electric was installed I picked up some drywall and mud. I repaired the area where the AC was installed. The rest of the garagecade isn’t painted so I decided to leave it bare for now (yes, I did tape/mud/sand). Eventually I’d like to paint the whole garagecade gray.
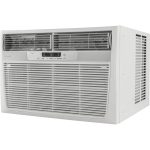
The unit is a 220v 30A 18,500 BTU air conditioner… it also has 16,000 BTU heat as well as a few other cool features. I can set the fan to bring cool air in to the garagecade… or exhaust… or set as normal. Because, of course, I got this done AFTER the “heat” of summer pretty much as dwindled, all I can tell you is that it blows cold… very cold. I’ve not tried the heat yet… though I doubt i’ll use that much.
SO! To conclude… I think I’ll pop back in to this article next year after a couple months of summer to update how the unit works. I suspect the small side of the garagecade (where it’s located) will be COLD… VERY COLD… while the larger side may be a bit warmer. It is supposed to cover 1000sf and the garagecade is only 600sf, but that wall does break it up. I’m considering adding a thru-wall fan at the far side between the walls which would help circulate cold air, but I think I’ll wait to TEST before I decide if I need such a thing… time will tell, but I do know one thing… I am going to be MUCH COOLER next summer in the garagecade… finally!


I did a decent job. I need to update this review as I did have to add a thru-wall fan blowing IN to the smaller room to create a positive pressure to “push” the cooler air in to the larger side…
how did it work in the heat for you?