
Asteroids Deluxe Multigame
Games Produced by Atari (c)1979, 1980
Multigame Produced by Braze Technologies
|
Condition When Purchased: |
C |
|
Current Condition: |
B+ |
In early 2007, toward the start of when I joined in on t his hobby, I happed to acquire the first of many Asteroids arcade games. Overall it was in decent shape with some side art help needed and a new control panel overlay, etc. It was during my searches for Asteroids items that I came across a webpage for a device that I simply HAD to have. Unfortunately, this item was still in the building stages and wasn't for sale… yet. I immediately emailed the creator of this item and let him know that I was very much interested in purchasing. He said he'd add me to the list of those interested. It would take over 9 years … 4 or 5 Asteroids arcade games … 3 Asteroids Deluxe arcade games … and even an extra Asteroids PCB sitting on the shelf for years before it was eventually sold… to finally acquire this item. This item is the Braze Asteroids Multigame Kit.
FINALLY! After many many years of patiently… and not so patently… and patiently again… waiting… one of my very first multigame "grails" has arrived and is happily purring along inside my 3rd (and 7th or 8th overall) Asteroids Deluxe arcade cabinet. This time I waited until I actually acquired the unobtanium BEFORE seeking out a cabinet to put it in … and I am thrilled to report that it took me less than two weeks after securing the mutigame kit to pick up an Asteroids Deluxe arcade cabinet (THANK YOU IDAHOFARMER!), a working Asteroids PCB (THANK YOU CWILBAR!), and a blue-gel monitor overlay as the game I picked up didn't have one. Why would I need an Asteroids PCB? While the Asteroids Deluxe PCB that was in the cabinet originally works fine, I picked up the multigame kit designed specifically for the Asteroids PCB, not the Asteroids Deluxe PCB. Why? Well, other than the fact that Scott told me he had an Asteroids kit sitting there ready to ship and the Asteroids Deluxe kits weren't assembled at the time, there is also a small audio issue with the Asteroids Deluxe kits. Evidently the Asteroids Deluxe PCBs are missing the required hardware to create some (all?) of the unique Asteroids sounds… while the original Asteroids can create the Asteroids Deluxe sounds. What that ultimately means is that Asteroids PCB's with the kit installed sounds pretty much perfect both in Asteroids and AD… evidently the kit installed on an Asteroids Deluxe PCB gets 'close' to the original Asteroids sounds, but not perfectly. I do not know personally as i only have experience with the original Asteroids multi-kit.
While it is true that you can plug an Asteroids PCB in to an Asteroids Deluxe cabinet (and vice-versa) without modification, there are some issues. For example, with an Asteroids plugged in to an Asteroids Deluxe, the first thing you notice is that the screen is mirrored. Asteroids Deluxe utilizes a mirror in it's cabinet while Asteroids doesn't. The next thing you will notice is that the P1 start button fires off one of the credit tickers… and if you want to play, you have to click the left coin switc h. You can actually play though as the left and right buttons are also reversed which allows you to play via the mirror without much issue … of course the score and what not will be reversed…. but the fire/thust and movement buttons work as you'd expect. To make things right you have to make a few modifications to the Asteroids PCB (or some folks prefer to create a harness that does essentially the same thing). Each of these modifications is easily reversed by the way.
The first modification is to mirror the image on screen so as that it appears properly in a mirror. This is easily accomplished by cutting a couple traces and reversing them. The next task is to reverse 6 inductors… also a very simply procedure. Finally, some folks need to swap in a 10K resistor in the audio circuit to increase the gain being output, however after doing so myself, I determined that someone had already swapped IN an Asteroids AR-I audio regulator PCB meaning the modification wasn't necessary and doing the mod actually caused way too much gain. Swapping the old resistor back in fixed the issue… but most folks putting an Asteroids in to an Asteroids Deluxe will want to do the audio mod as well as the gain will be way too low. You can follow the instructions from KLOVian andrewb HERE. Those are the exact instructions I used and I appreciate that andrewb posted them. By the way… no laughing at my amateur hacking skills… they are what they are and it works! 🙂 (also, that top tow inductors look like they are touching…they are not, not even close, it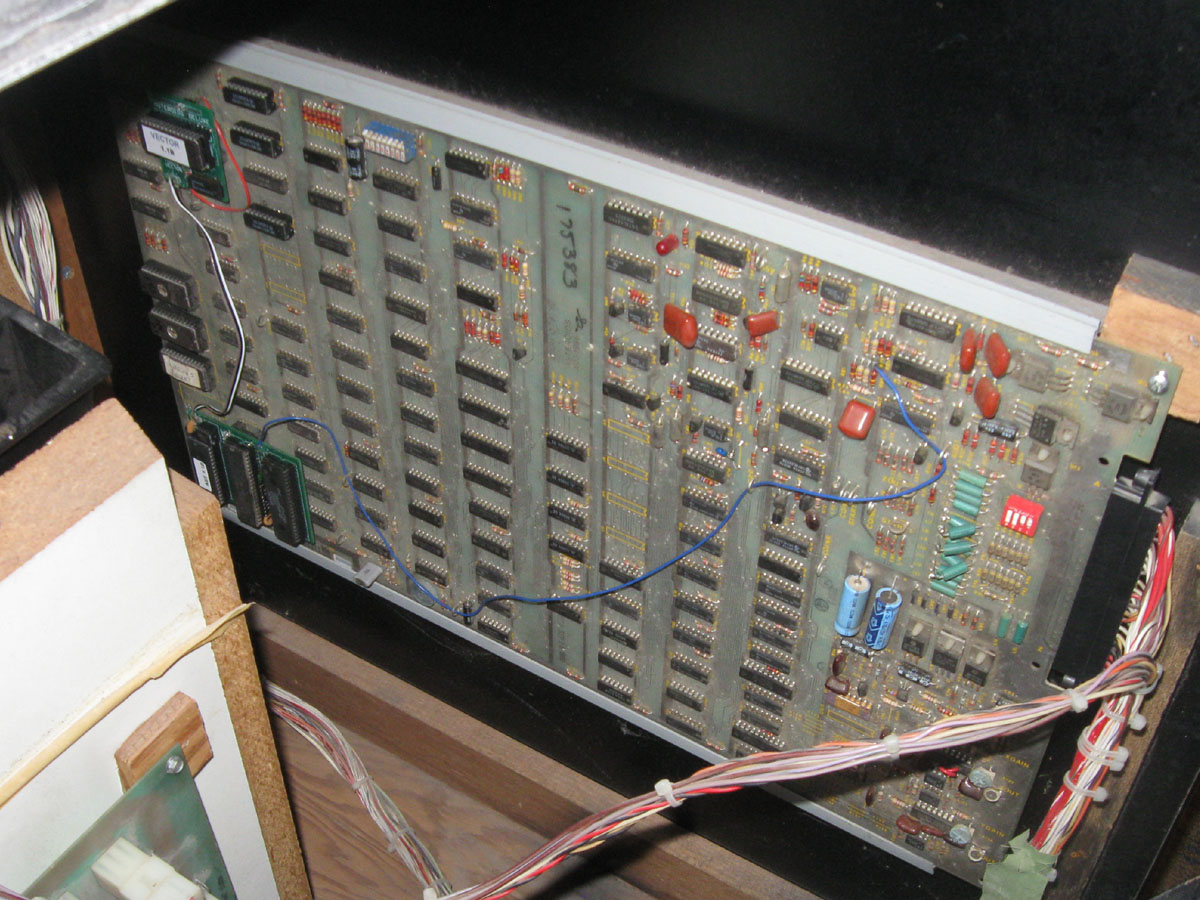 's the angle of the image.)
Now that the PCB is setup to work in an Asteroids Deluxe PCB (and having verified so, of course), it was time to install the multigame kit. Installing the kit involved removing the CPU and installing it on the larger satellite PCB, then installing the larger satellite PCB at the socket that you removed the CPU from. There is another IC at the other end of the PCB, same row, that needs to be removed and the smaller satellite PCB installed at that location, but before you do so you have to solder a wire to a location directly next to the socket. After the wire is soldered in and the smaller satellite PCB installed in the socket, the last thing to do is wire an audio circuit to one of 6 resistor legs. The instructions are thorough and the photos available online are large enough to actually be of help. When all is said and done, the PCB will look like the photo to the left. At this point it's time to start up the game, drop in to the settings and setup how you want the cabinet to work. I set my game up to power up to Asteroids Deluxe since that is the cabinet it is in.
Speaking of cabinets, as I mentioned earlier, after owning a number of Asteroids and Asteroids Deluxe machines only to eventually sell them to make room for other games, I decided I was going to hold off on picking up another until I had my hands on a multigame kit. Once that happened, thanks to KLOVian Idaho Farmer, I was able to acquire a decent cabinet within a couple weeks of securing the multigame kit. The game was working fine… however the sound seemed over driven. the physical c ondition of the cabinet was what I would classify as "average" or "C" condition. The side art was mostly intact with some fraying on the edges. There were a few small "chunks" of side art missing. The front right area of the side right next to the control panel looked pretty bad. The game had no blue monitor gel. The blacklight was burned out… etc, the control panel was cracked bad enough to warrant replacement, etc. Nothing terrible, but it was certainly not in pristine shape. I was on the fence as to whether the cabinet warranted a full restoration with new side art, etc. When I considered the fact that new side art comes in at about $220 + shipping… and the fact that the side art wasn't in terrible shape… that the problem areas were primariy in the white "border" areas… I decided to go with a REFURBISH job rather than a RESTORATION. Using white acryllic paint I picked up from Wally World and a set of Sharpe pens I went to w
 ork… as you can see to the right, the end result isn't bad at all. The last thing I did was apply new T-Molding as the old stuff was breaking up.
To finish up the game, I am currently waiting on a control panel overlay from This Old Game. When it arrives I plan on stripping the old CPO, painting, then I will apply the new CPO. I also want to "tune" the buttons a bit as they are very very stiff. I will update this blog when that happens. As for now, I am exceptionally excited to FINALLY have an Asteroids Deluxe multigame in the game room. When you play both games you realize just how different they are. On cursory glance, they appear very similar, but game-play wise, they are very much different… for me. With Asteroids, it's all about pounding the fire button with very little thrust action from me. I stay toward the center and try to blast away. With Asteroids Deluxe, I hold down the fire button (Asteroids Deluxe DOES have repeat fire by default if you didn't know), and use thrust a lot more. I find both games to be basically equally enjoyable. What used to set Asteroids Deluxe over the edge for me was the cabinet, but now that I can play Asteroids in the same blacklit cabinet, it pretty much evens things up. To sweeten the deal we have Lunar Lander… a game I never really played back in the day. I can't really compare how it plays with buttons versus the actual controller as I literally have played the game with the actual controller maybe a half dozen times in my life… maybe. That said, the game is very playable with buttons… and it's a great addition to the other two games. It's also sort of cool playing Lunar Lander in an Asteroids Deluxe cabinet as well.
Update: May 16, 2016
The final component on this refurbish is the control panel overly. The overlay that was installed, while not insanely terrible, did need to be replaced. The biggest issue with it was the usual 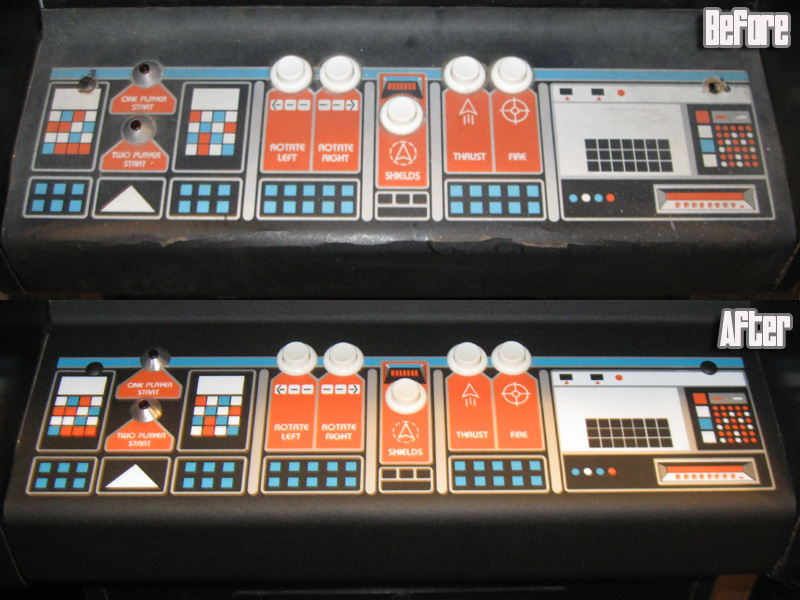 cracking along the front edges. I managed to pick up a CPO from a known source. It showed up and was of expected quality… that's to say that it looked frantastic. The colors are vibrant… and the accuracy spot on. Stripping the old Atari overlay was the typical crap job that it is. Atari's overlays tend to come off easy enough (removing the actual overlay took me maybe 8-10 minutes). It's the layer of adhesive that it leaves behind that is a pain in the ass. On went the stripper I usually use (Soy-Gel)… 20 minutes later most of the adhesive and half the paint scraped right off. A 2nd application of the stripper did the trick. Of course scraping this crap off is a mess.. the adhesive/paint mix turns in to a dark clumb of goo that sticks to just about anything. Cleaning CPO crap
  off ranks right below "sanding paint" on the "crap I hate to do" list. Once the adhesive and most of the paint was gone, I took the rest of the paint off with my drill and a paint removal "stone". Next up it was time to prime, then paint. I let the panel sit for a couple days after painting… out-gassing sucks and it's a real good way to ruin your CPO application. As for the actual application, because the CPO's holes weren't pre-cut, I had a little "room" to work with as far as application was concerned. I ended up applying the CPO about 1/16" too far down as compared to my original, it it still looks fantastic. Before I put the buttons on, I pulled each apart and cleaned them. I also cut the spring by about 1/3 … taking the smaller side of the "cone" off… which HELPED A LOT as far as the '"feel" of the buttons are concerned. It's hard to describe just how much of an improvement cutting those springs made.
Asteroids Deluxe Multigame is now in it's new home, where I hope it stays for some time to come. The cabinet refurbish turned out great. I am glad I didn't spend the time and money to replace the side art. While doing so would have improved my overall score from where it sits now (B+) to perhaps an A… the expense both in dollars… and more importantly, time… probably would have exceeded the benefit obtained. I am thrilled with the ultimate result of the refurb…
More Photos:


")
")
")
")
")
")
")
")


