Multipede (ArcadeSD Multigame)
Cabinet Manufactured by Atari (c)1980
Game PCB Manufactured by Clay Cowgill (c)2011
|
Condition When Purchased:
|
C-
|
|
Current Condition:
|
B+
|
I picked up this Centipede cabinet back in 2008 or 2009 with the idea that I was going to use it as a multigame. I had a spare 60-in-1 at the time and wanted to drop it in the cabinet to make a cheap “Multipede” of sorts. The cabinet had already been b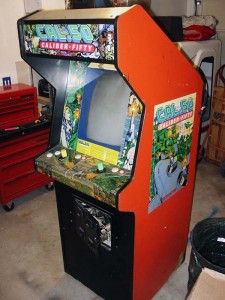
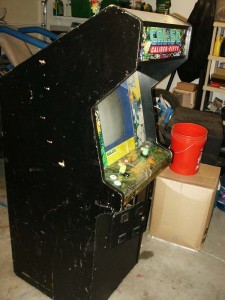 astardized with someone pulling the original game and artwork and converting it to likely many games before I found it as a Caliber .50. As you can see, one side of the cabinet had a thin red layer of veneer while the other side evidently already had the veneer removed as it was beat up and painted black. Had I known then what I know now, I would kept a hold on the Cal.50 PCB and artwork and made a rotary stick cabinet at some point, but it was pretty early in my collecting years so I ended up selling the Cal.50 parts likely for much less money than I could have. Such is life.
I don’t remember if the game worked or not. I don’t recall even playing the game once before tearing it down. It probably remained a Cal.50 in my possession for less than a couple hours before tear-down began. I do remember it being less of a pain in the ass to remove the veneer than I’d expected. It came off in only a few pieces and didn’t leave a bunch of glue behind as I expected it to. The painted side was another story. The paint job was done pretty badly and it took an unusual amount of sanding to get it flat, and everyone knows just how much I love sanding (yes, I am being facetious).
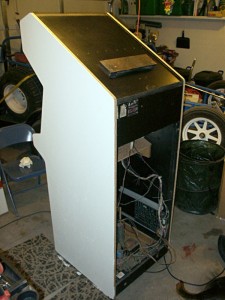 After a bunch of sanding, some bondo, a little more sanding, and primer, I decided to cover the cabinet in white paint. I assumed (correctly I might add) that the full side art I was getting WOULD include the white space around the art however I figured covering any color other than white with white vinyl would likely alter the color of the white vinyl slightly, so I stuck with white paint. I went with flat paint as I read that things adhere to flat paint better than glossy or semi-glossy paint. Around the time the paint fully cured (always wait 72+ hours before applying artwork) my full side art arrived in the mail. The art I picked up was evidently Phoenix Arcade side art that the colors came out slightly wrong … or a color was missing … or some such thing. I picked it up from a KLOV member for a good price, it was about 1/2 the cost of the normal side art from my recollection. Being this wasn’t going to be a full “original” restoration, the slightly off colors didn’t bother me in the slightest. Being this was my first full side art installation, I was already nervous using this art, I can only imagine how much more nervous I would have been had I been using full priced artwork. Luckily, in the end, my worry wasn’t really necessary as I managed to install the artwork without much
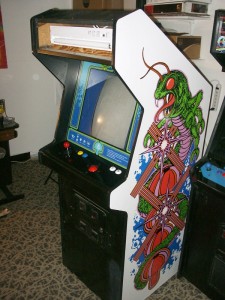
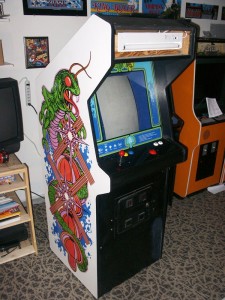 trouble.
Until I had time to create custom artwork for the control panel I simply painted it black. I did pick up a reproduction bezel from Arcade Shop (I believe it was) and I had a custom Multipede marquee printed up for me from www.gameongrafix.com (which at the time was named MAME Marquees). The marquee artwork is not mine, but I did modify it and clean it up a bit. Unfortunately it was low resolution to start and even with cleaning up the resulting print ended up being “barely” acceptable. It’s slightly blurry… but nothing terrible. Had I had a higher resolution version to start with, or if I had learned to vector the artwork, it would have come out a little better. Again, being that this wasn’t a full restore job but rather a re-imagining of sorts, it wasn’t a big deal by any stretch. Next came time to work on the control panel artwork. I knew I wanted to maintain the “feel” of the original art, but it had to accommodate a joystick and extra buttons. What I came up with, I feel, works well in this aspect.
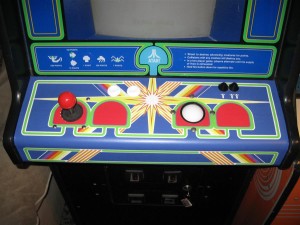 What I decided to do with the control panel was to take the 3 mushrooms on the original, and turn them in to 4 mushrooms. I situated the stick in the left-most mushroom while the trackball remained in it’s original location. I kept button 1 in it’s original location and added a 2nd button to the right of it. Due to the fact that there was some damage to the control panel and the close proximity of the Wico joystick, I moved the P1 and P2 start buttons from the left of the panel to the top right of the panel. It also helps to balance the overall look of the panel IMHO. I had the CPO printed by www.gameongrafix.com as well… and it still looks as awesome the today as the day that I installed it.
Originally I ran a 60-in-1 PCB in this cabinet. I wasn’t very happy with the 60-in-1 at this point due to the fact it doesn’t save high scores (well, it saves the highest score ONLY … no initials, etc), I purchased a 2nd 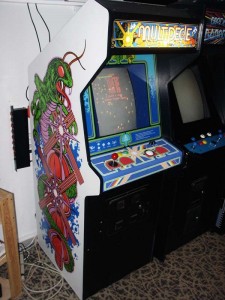 Arcadeshop PCB to run in the cabinet. I ran that 2nd Arcadeshop PCB for a couple years until the ArcadeSD came out. I acquired an ArcadeSD PCB within weeks of it’s release and it’s been sitting in the cabinet since. I would like to swap out monitors one day. I still have the original G07 in the cabinet, which was re-capped years ago when I first started this project, but it’s always had some minor Centipede burn-in. Nothing too dramatic, but certainly noticeable. One day I’ll pick up a tube that I can swap in, or a full 19″ monitor. I’ve had many opportunities to do so in the past, I just never took advantage of those opportunities mostly because the monitor is borderline “bad” … well, just a har below that mark… making it less of a priority than it probably should be. Originally I ran a microswitch stick in the cabinet (some Asian ball stick) which worked OK, but in about 2012 I swapped it out for a Wico 4-Way leaf switch stick. I did tweak the leafs so that I can get all 8 directions yet keep the “feel” of a 4-way stick with the restrictor plate installed. For now, the game is complete. One day I may swap out monitors as mentioned… and if Clay ever releases an update to the ArcadeSD (harware), I may swap that in, but for the most part… it’s fine as it is. Oh, and for those wondering why I put the joystick dust washer on the TOP of the control panel… it was a conscious decision to cover the not so great looking hole I cut in the CPO. Thanks for reading.
Update 8/2/18:
The Electrohome G07 19″ CRT monitor that this cabinet has housed for many many years has always been a little bit of a thorn in my side. The problem isn’t that it doesnt work. It works great. It’s built like a brick shit-house (as most Electrohome G07’s are). The problem is the tube. It’s the original tube with very noticeable centipede burn in. The monior just looks… old. I’ve wanted to swap out the monitor for years but have never had an “extra” 19″ CRT just sitting around to do it with. That is, until recently. Back in May a local operator posted an ad for 4 “working” Vision Pro monitors. They were pulls from video poker machines and had varying degree of burn. I checked them out and decided to pick all 4 of them up. The burn ranged from nearly non-existent to low-medium burn. None were as bad as the Centipede burn on the G07. The monitors did work… but they all needed to be recapped. I used one of the recapped monitors to replace Frankenstein’s monitor in the Wizard of Wor (you can read more about it HERE). The monitor with the least amount of burn (it’s nearly not there) found a home in this cabinet. After years and year of playing games with burned-in G07, the difference is pretty stark. Not only are the colors better… but the geometry is a little better as well… and no burn. Awesome!


